To author a quiz with examiner, you will write:
- A main R markdown file with the output format set to one of
examiner::test_knit,examiner::canvas, orexaminer::wiseflow. The body of this file becomes the quiz description in Canvas, or the assignment info page in WISEflow. - An R markdown file for each question, with headings
Question and Answerlist marking the location of the
question text and answer options. You will list the names of the
question files under the
questionsheader of the main quiz file.
The available output formats are:
-
output: examiner::test_knit- A single-file HTML report for quick inspection -
output: examiner::canvas- Create a Canvas quiz using the CANVAS API -
output: examiner::wiseflow- Export a WISEflow assignment import file
Try it out!
Make a “Quizzes using examiner” project
It is most common to have one RStudio project per Canvas course. The
course code and other configuration is kept in a special file called
.Renviron in the project root, which the New Project wizard
will create for you.
In RStudio, click the “New Project” button (second at top left) or click File > New Project. Choose “New Directory”, then scroll down and click “Quizzes using examiner”.
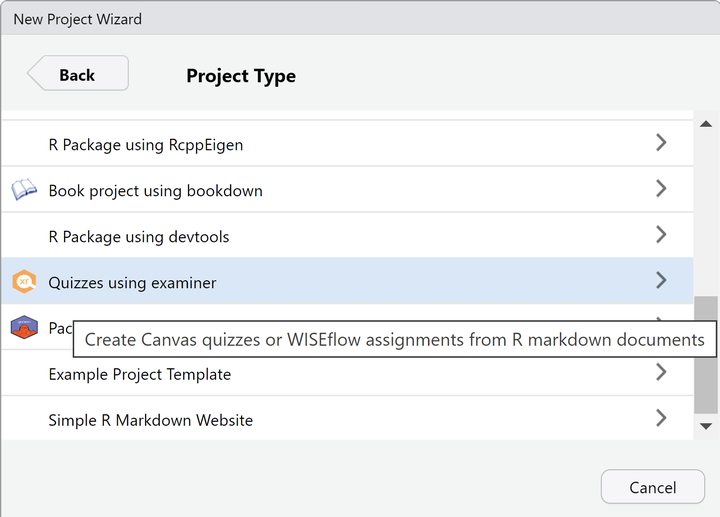
This brings up a dialog for configuring your project:
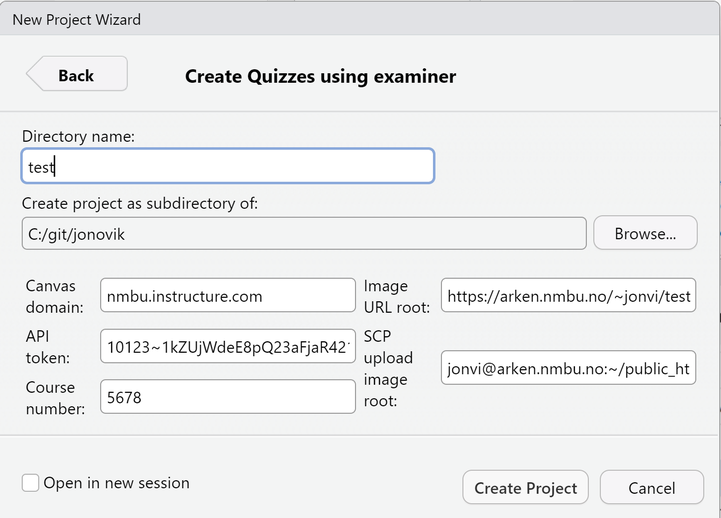
- Directory name: You must specify a name for the new project directory which RStudio will create for you.
- Create project as subdirectory of: The parent of the new project directory.
The remaining dialog box fields configure your project for Canvas (left) and WISEflow (right). Carefully follow the configuration guides below and fill in the remaining fields, then click Create Project.
Configuration
To use Canvas, you need Teacher permissions in a Canvas course, and
examiner needs to know your Canvas domain,
API token, and
course number. That’s easy. Click the “Canvas” tab for a detailed
walkthrough.
To use WISEflow, you need a login at https://wiseflow.net. Quizzes which use only images
which are openly available online will work right away. But to include
graphics output from R, or local image files, you need passwordless
access to a web server where examiner can upload your
images. That requires a one-time setup of
ssh keys. Furthermore, for each
project you must tell examiner where to store your image
files. See the “WISEflow” tab for a detailed walkthrough.
(If you decide to skip this and accept all defaults in the New Project wizard, you will still be able to try out WISEflow files without R-generated images, and can explore the format of the quiz and question files.)
A video walkthrough is below the instructions.
-
Canvas domain: You can find this from the address
bar when you visit your Canvas course in your web browser. In my case
it’s
nmbu.instructure.com. -
API token: An authorization key for automated use
of the Canvas
API.
How to generate a Canvas API token (click to expand or collapse)
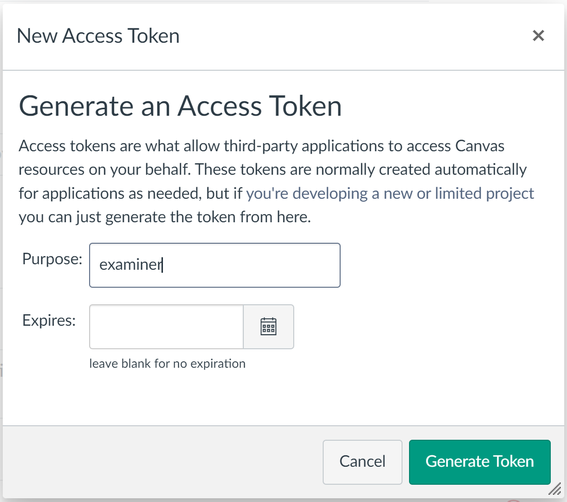
- Visit your Canvas profile settings:
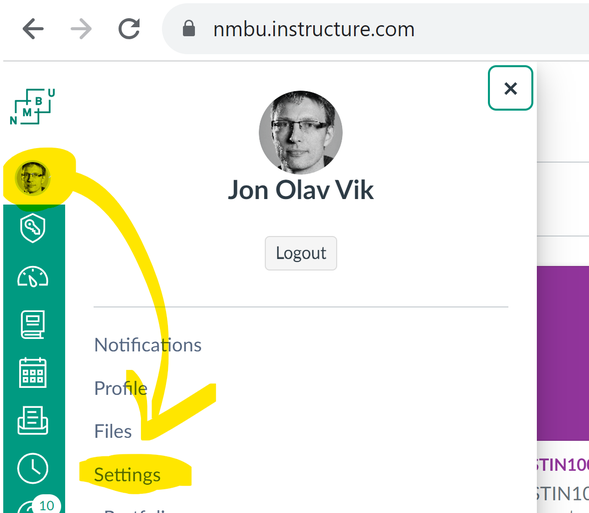
- Scroll down and click New Access Token (“Ny tilgangsnøkkel” in
Norwegian). Give the token a name you can remember it by, and click
“Generate Token”.
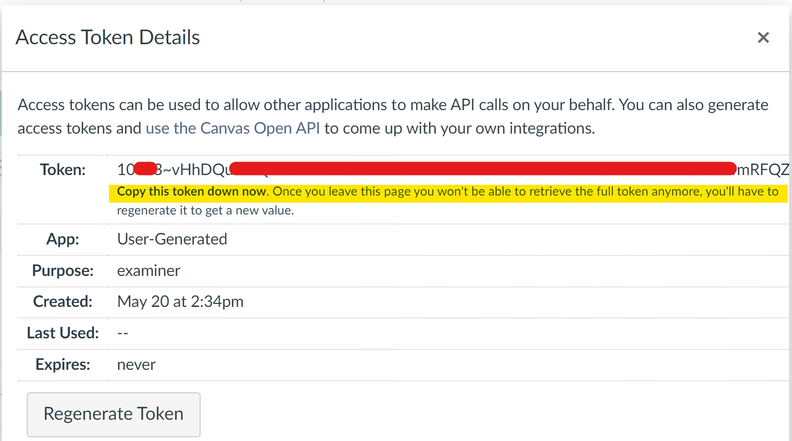
-
Copy and keep the API token you just generated. You
will use it for all your
examinerprojects. Don’t give it away to others. If you accidentally expose your API token, you can delete it from your Settings page: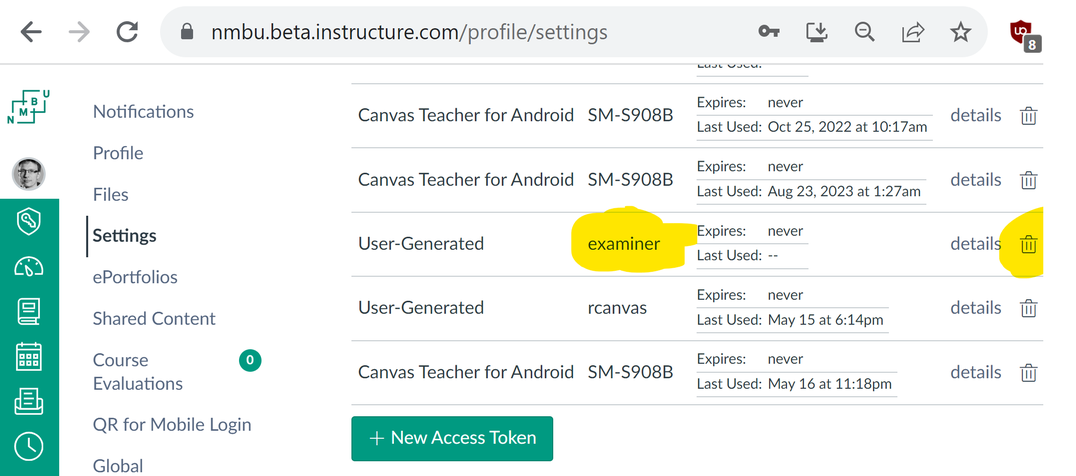
- Copy the Canvas API token into the “API token” field of the New
Project Wizard for your
examinerproject.
- Visit your Canvas profile settings:
- Course number: You can see this from the URL when you view your Canvas course in your web browser.
Video walkthrough of configuration and usage:
Video tutorial created by Berit K. A. Økland.
A video walkthrough is below the instructions.
Web servers usually have a file system where each user (that’s you)
has a magical folder, perhaps called public_html, whose
contents are made available at some URL. For example, my web server is
arken.nmbu.no, my username is jonvi, and the
public_html folder in my home directory is the “web root
directory” which is served at
https://arken.nmbu.no/~jonvi/
You’ll need to find out the same information for yourself and make a note of it: Server name, user name, web root directory, and URL. Next, you’ll need to configure an ssh key pair if you haven’t already.
The guide below assumes that your web server is running Linux, that
you use the default placement of ssh keys, and that the command-line
tools ssh (secure shell) and scp (secure copy)
are available. If you have any trouble, ask a knowledgeable colleague
(or your IT support) for help with the initial setup. Afterwards it
should Just Work 8-)
Click the headers below to expand or collapse the guides.
Specify “Image URL root” and “SCP upload image root”
These settings are specific to each examiner project,
unlike the ssh keys which are a one-time setup.
Image URL root is where the world can see the files
you make available. Typically, it would be subfolder under your space on
the web server. For example, I might use
https://arken.nmbu.no/~jonvi/MATH1234 for a maths
course.
SCP upload image root is a full SCP path,
username@server:~/foldername, for the corresponding folder
as you see it when logged in to the web server using ssh or
a file transfer tool like FileZilla or WinSCP. In my example, that would
be jonvi@arken.nmbu.no:~/public_html/MATH1234
Check that you have ssh and
scp
If you have a Mac or Linux computer, skip to the section “Set up ssh keys” below.
If you are on Windows, check if you have ssh and
scp available. These programs are used by
examiner to automate uploads.
Open a command prompt (also called a “terminal”) and type:
ssh
It should return something like “usage: ssh [-46AaCfGgKkMNnqsTtVvXxYy] [-B bind_interface] [-b bind_address]…”
Likewise, type:
scp
It should return something like “usage: scp [-346ABCOpqRrsTv] [-c cipher] [-D sftp_server_path] [-F ssh_config]…”
If instead you get an error like “‘ssh’ is not recognized as an internal or external command…”, ask your system administrator to get ssh and scp installed.Set up ssh keys
Check for existing
keys:
You might have ssh keys already, for example if you have previously
got help with setting up a GitHub account. Replacing
username with your actual username and
server.example.org with your actual web server, try this in
a terminal:
ssh username@server.example.org
(For me it would be jonvi@arken.nmbu.no)
One of three things should happen:
- You successfully log in without being asked for a password. Then you already have ssh keys set up and can skip the rest of the guide below. Proceed to the Ready! section 8-)
- You are asked for a password and can log in with that. Keep the terminal open and proceed with setup as described below.
- The
sshcommand seems to hang for a minute, then times out. Double-check that the server name is correct. If you cannot connect, and you are away from your workplace, you might need to connect using VPN and try again. Ask a colleague for help if you’re unsure.
Check if a .ssh settings folder already exists:
Assuming you are now logged in to the web server, check if the .ssh directory already exists by attempting to list the files within it:
ls .ssh
If it does not exist, run this command to create it:
mkdir .ssh
Leave the terminal open! We’ll use it again later.
Create an ssh key pair:
Open another terminal and create a public/private key pair using the command:
ssh-keygen -t ed25519
Press Enter to accept the default filename and location. Choose not to set up a passphrase.
After the process completes, you will have the following files in a
directory called .ssh under your home directory:
-
id_ed25519: This is your private key. Keep it secure and never share it. -
id_ed25519.pub: This is your public key. You can share this key with any service or person that needs to verify your identity.
Copy the public key to the web server and add it to your list of “authorized keys” for that machine:
Copy the public key file to the web server by running the following
command. As before, replace username with your actual
username and server.example.org with your actual web
server.
scp .ssh/id_ed25519.pub username@server.example.org:~/.ssh
Switch to the terminal where you are logged in to the web server, and add your newly created public key to your list of “authorized keys” on that machine:
cat .ssh/id_ed25519.pub >> .ssh/authorized_keys
The .ssh folder and authorized keys file should only be readable by
you, so you need to set permissions using the chmod
command:
chmod 700 ~/.ssh
chmod 600 ~/.ssh/authorized_keys
Test that passwordless ssh works:
Switch to the terminal on your local machine, i.e. the one where you are not logged in to the web server.
Replacing username with your actual username and
server.example.org with your actual web server, the
following command should now log in to the web server without asking for
a password.
ssh username@server.example.org
If it works, congratulations! You won’t have to do this setup again
in the foreseeable future. Close both terminals and get back to
exploring examiner.
Video walkthrough of configuration and usage:
Video tutorial created by Berit K. A. Økland.
Ready!
Your new project will open with an example quiz file in your RStudio
editor. Its main contents will become the front page of the quiz. The
questions field in the “yaml header” at top specifies the
questions: One Rmd file per question.
Test knit
Click the Knit button to compile a single HTML file from the quiz file and all the question files.
Study the generated report and see how it matches the quiz and question files. When generating Canvas quizzes or WISEflow assignments, the “stimulus text” for each question becomes whatever is under the Question header, and the answer options are the bullet points under Answerlist.
Export to WISEflow
Note: R-generated images will not work until you configure your
examiner project for WISEflow as described above.
Change the output format of the quiz file to
output: examiner::wiseflow by modifying that line of the
yaml header at the top of the quiz file.
Click the Knit button again. After a short while, you should see a page with instructions on how to import the newly created file into WISEflow.
Create a Canvas quiz
Note: This won’t work until you configure for Canvas as described above.
Change the output format of the quiz file to
output: examiner::canvas by modifying that line of the yaml
header at the top of the quiz file.
Click the Knit button again. After a short while, you should see a page linking to the newly created quiz.
Next steps
You can edit the quiz and question files to make
your own quiz. Create new question files from the RStudio “New File”
button (top left), or click File > New File > R markdown > From
template > multiple_choice_question. Add the names of the new
question files in the questions field of your quiz file to
make them part of the quiz. Knit again and have fun!
You can use R and many markdown and HTML features. See the third question file in the example quiz for details.
You can include images from your file system as well as graphics created with R. For Canvas, this requires no additional setup beyond the usual Canvas configuration. But for WISEflow, you’ll need passwordless ssh access to a web server as described in Configuration above.
You can use other question types than multiple
choice. To try it out, use the multi-file template called
canvas_gallery: RStudio > New File > R markdown >
From template > canvas_gallery. Study the source code of the question
files to see how the markdown for each question type is specified. The
following question types are currently available:
- essay_question.Rmd
- file_upload_question.Rmd
- fill_in_multiple_blanks_question.Rmd
- fill_in_multiple_numerics_question.Rmd
- hotspot_question.Rmd
- matching_question.Rmd
- multiple_answers_question.Rmd
- multiple_choice_question.Rmd
- multiple_dropdowns_question.Rmd
- numerical_question.Rmd
- short_answer_question.Rmd
- text_only_question.Rmd
- xhtml_features.Rmd